How to produce screen shots for the app store using only standard Apple software
Apple suggests screen shots for the app store be 320 x 460 TIFF or high-quality JPEG images
with the status bar removed.
This shows how to produce such an image
without requiring the purchase of additional image-editing software.
However,
there’s a bit of a knack in getting the top of the selection positioned just right.
I've found with a little bit of practice it’s not that hard.
Take the Screen Shot and Transfer it to the Macintosh
There are several ways to do this. One is
-
Navigate the iPhone to the screen image desired
-
Hold the "front" buttons down and push the "top" button to take the shot
-
Bring the picture up from the iPhone to the Macintosh using iPhoto
by selecting the image in the device view
and hitting the "Import Selected" button
-
Once uploaded the image can be dragged to the desktop to generate a PNG file
Crop the Image and Save in Appropriate Graphics Format
The goal of this step is to remove the 20 pixels at the top of the image,
which contain the status bar.
-
Open the image in Preview, and if desired,
grow the window to the height of the screen
and zoom in on the image.
-
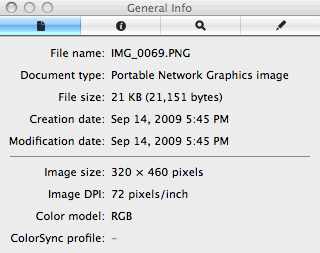
Choose Show Inspector from the Tools menu
and ensure the General Info tab is selected
(Figure 1)
-
If necessary, set Preview into selection mode,
then start a selection anywhere that is entirely within the image area
(Figure 2)
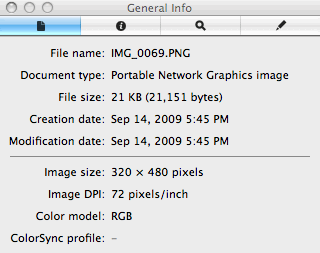
Figure 1: Inspector window, General Info tab
|
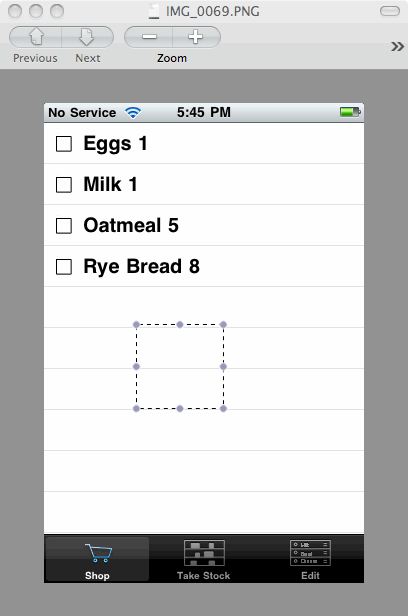
Figure 2: Starting a selection within the image
|
-
Using the handles on the selection rectangle,
drag the left, bottom, and right sides of the selection entirely outside the image
(Figure 3 shows after dragging left and bottom but before dragging right)
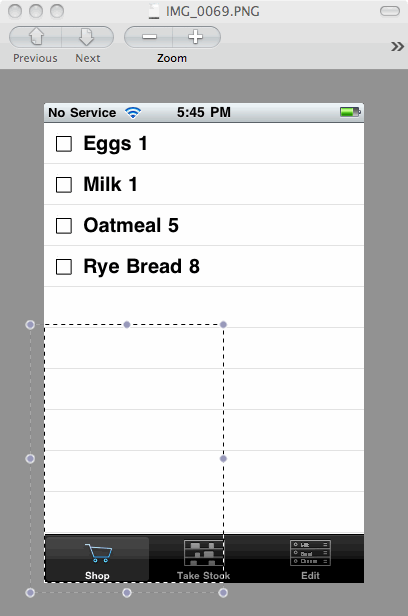
Figure 3: Selection dragged outside for left and bottom
|
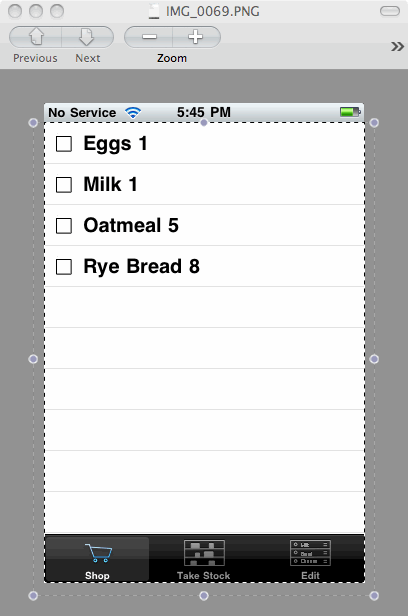
Figure 4: Selection top one pixel below status bar bottom border
|
-
This is the tricky part!
Drag the top of the selection to one pixel below the status bar
(Figure 4)
Magnified, this is the desired position

-
Choose Crop from the Tools menu,
if all went well, the size inspector will now say 320 x 460 pixels
-
If step 6 shows an incorrect size,
choose Undo Crop from the Edit menu, and start again at step 3:
if the height is too large (461 or more),
try to get the top of the selection rectangle a little farther away from the edge of the status bar,
if too small (459 or less),
try to get the top of the selection rectangle closer to it
-
If step 6 shows the correct size,
choose Save As ... from the File menu,
and save the image as either as either TIFF or high-quality JPEG
The extension of this technique to landscape images is left as an exercise to the reader.
Return to Developer’s corner